Explore
Viewers of a document have the ability to Explore the charts and tables or to create their own tables and charts. Explore mode allows the user to either create a new table or chart, or, modify an existing table or chart in the published document (e.g., changing the data that is selected, selecting different statistics). The user has access to many of the same controls that you have when editing in Displayr. Any tables or charts that are created in Explore mode will be available only to the user that created them (ie this feature is not a way of modifying the dashboard for other dashboard users). Only logged-in users with appropriate access rights to the company Displayr account will have their outputs saved and available the next time they view the report.
Explore mode is started by clicking the Explore button (top-right corner); users only have this option if it has been made available (see below). Any charts or tables created by the user can be saved (by pressing Copy), and will then be available to the user whenever they go into the dashboard and will update whenever the dashboard is updated.
Statistical analyses and items created using the Visualization menu are not available to explore.
How to use Explore Mode
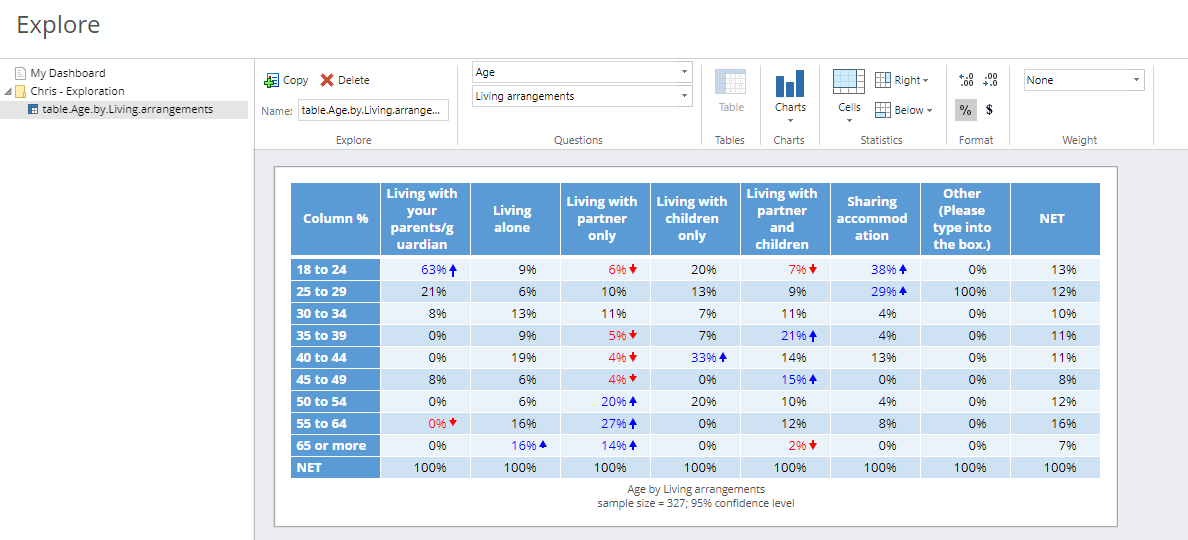
There are seven sections of options in the Explore Mode ribbon:
Explore
The buttons Copy and Delete allow you to copy your existing table/output, or deleting it. Also use this to create a new table or output and then change the variable sets used under Questions to show different data in the table/output.
The Name field is the reference name of the table/output you've created. This can be altered if required.
Questions
These two drop-downs allow you to select the questions (variable sets) that go in the table/output you've created. All questions in the project that haven't been hidden by the dashboard designer will be available to select here. The topmost drop-down is the question that goes in the side of the table (rows/stub), and the bottom drop-down is the selection for which question should go across the top of the table.
Tables
Table allows you to switch a chart output back to a table.
Charts
The Charts drop-down allows you to select different chart types to turn your table into. Examples of the different chart types can be seen on our [examples dashboard].
Statistics
The Statistics section allow you to select the statistics that are shown in the Cells of the table, or in separate row(s) / column(s) Below or to the Right of the table.
Format
In this section, the top two buttons allow the increasing or decreasing of decimal points, and the bottom two buttons the applications of %-signs or $-signs to the data in the table.
Weight
In this drop-down you can select any weights available in the document, and apply them to the data in the table.
Filters
On the far right of the screen, a list of available filters will also be provided. Checking a filter will apply it to the table/output. It's possible to create additional filters by selecting the cells in some table types (click the cell and hold down ctrl or shift to select further cells) and then clicking Create Filter. The cases in the data that fits into those cells will then constitute the members of the filter.
How to Enable Explore
If your document requires password access, user groups with access to your document must have explore mode enabled. To do so:
- Click the Navigation button in the top left of the window and select Company Settings.
- Scroll down to Groups.
- Select a group which has been given access to the document.
- Ensure the Users in this group can Explore box is ticked.
- Click Save.
